Saturday, December 24, 2011

Hot Cocoa Cookies


In preparation for Martha's 2nd Annual Cookie Swap, LaDawna came over to my house for us to work together to make our cookies.  I had chosen the Triple Chocolate Oreo Chunk Cookies, but she wasn't quite sure what she should make for her contribution.  Similar to what I did for my cookies, I let my fingers search google to see what we could come up with.  Somehow, we got our minds fixed on fluff, so I searched and found this Hot Cocoa Cookies recipe.  In regards to the fact that they are a cocoa based cookie, they were similar to mine, however these have fluff and marshmallows in them, and had ooey-gooey sweet consistency that was exactly like their name -- hot cocoa in a cookie!  These are definitely cookies we want to make again.
  • 1 cup butter, at room temperature
  • 1 ½ cups sugar
  • 2 eggs
  • 1 tsp. vanilla
  • 2 cups flour
  • ½ cup cocoa powder
  • 1 tsp. baking soda
  • ¼ tsp. salt
  • ¼ cup marshmallow fluff
  • 1 cup chocolate chips
  • 1 cup mini marshmallows
DIRECTIONS
  1. Preheat oven to 350°.
  2. Cream butter, sugar, eggs and vanilla until fluffy.
  3. Add flour, cocoa powder, baking soda and salt and mix until combined. Stir in marshmallow fluff.
  4. Fold in chocolate chips and marshmallows.
  5. Cover dough with plastic wrap and refrigerate for 30 minutes to 1 hour.
  6. Remove, and roll into 1 ½” balls.
  7. Bake at 350° for 10-12 minutes. Make sure cookies are fully cooked, because they will be very sticky from the marshmallows.
  8. Allow cookies to cool completely, even sticking them in the fridge for 15 minutes before removing from the baking sheet with a spatula. Be patient and gently remove cookies – let sit another 30 minutes.

Adapted from:

Triple Chocolate Oreo Chunk Cookies


My friend Martha hosted her 2nd Annual Cookie Swap for a combination of our friends and her friends.  There were over 20 different types of cookies represented this year.  The weekend before, I started searching the internet for a different kind of cookie -- different from what I have ever made before, and different from what the other ladies would be bringing.  I googled "oreo", since I had them on my mind.  I'm not sure if I thought that I would try making a homemade Oreo, or what, but I came across this recipe that called for crunched up Oreos, plus white chocolate -- two of my favorites.  With Catherine and LaDawna's help the weekend before, we made up this delicious cookie.

  • 2½ cups all-purpose flour
  • 1 tsp. baking soda
  • ¼ tsp. salt
  • ¾ cup cocoa
  • 1 cup unsalted butter, at room temperature
  • 1 cup granulated sugar
  • 1 cup light brown sugar
  • 2 large eggs
  • 2 tsp. vanilla extract
  • 1 cup chopped white chocolate (or chips)
  • 1 cup chopped semi-sweet chocolate (or chips)
  • 1 cup chopped Oreo cookies
DIRECTIONS
  1. Preheat oven to 375°. Line a baking sheet with parchment paper or silicone mat. Set aside. 
  2. In a medium bowl, whisk together the flour, baking soda, salt, and cocoa powder. Set aside. 
  3. With a mixer on medium speed, cream the butter and sugars together until smooth. Add the eggs, one at a time. Next, add in vanilla extract. Mix until blended well, scraping the sides of the bowl as needed. 
  4. Slowly add the flour mixture and mix just until the flour disappears. Stir in the chocolate and Oreos. Drop cookie dough by scant ¼ cups onto the baking sheet. 
  5. Bake cookies for 8-10 minutes. Don’t over bake – if the cookies are set around the outside but still soft in the middle, they’re ready to come out. Remove from the oven and let sit on baking sheet for 3-5 minutes. Move to a cooling rack and cool completely.
NOTE:  Recipe called for dutch processed cocoa, but I used regular Hershey’s.  I’m not sure if it made a difference or not.


Adapted from:  

Thin Mints

A couple weeks back, my friend Martha hosted her 2nd Annual Cookie Swap.  My other friend, Tasha, brought these Thin Mints to share, but not to swap.  Everyone raved about them and insisted that they tasted as good as the Girl Scout Thin Mints.  Unfortunately, I'm not a fan of Thin Mints in general (or really, just mint), so I didn't partake, but I was so intrigued that I figured I had to make them.  I made them, first, for the NSOD Holiday Showcase bake sale.  But, I only had semi-sweet chocolate chips.  I was so confused why I was having such a hard time dipping them.  All of my other friends who were making them were saying that it only took them 20 minutes and it was super easy.  I was going well over an hour, and they were a pain in the bleep.  Since I had tons of Ritz crackers left, and if I didn't start to use them I'd eat them, I decided to give them another try, but this time buying the dark chocolate.  Let me say, I really think that made all the difference.  They were so much easier to make!  And Jim gave this batch a thumbs up, whereas the first round was just "eh".  I couldn't understand why everyone else making them was raving over them, and these were just "ok".  It had to be the dark chocolate.  Now, Jim is saying he can't stay away from these.


  • 1 sleeve Ritz crackers (may need a few more)
  • 1½ tsp. peppermint extract
  • (1) 12 oz. package dark chocolate chips
  • 1 tsp. Crisco
DIRECTIONS
  1. Melt the entire package of chocolate chips in the microwave with one teaspoon of Crisco -- about 2 minutes at about 80% power, stopping every 30 seconds to stir for even consistency.
  2. When fully melted, stir in peppermint extract.
  3. Dip the Ritz crackers in the melted peppermint chocolate until all of the chocolate is gone.
  4. Place on wax paper and put in the freezer to set up.
Makes about 1 - 1½ sleeves worth of Ritz crackers

Corn Casserole


We had our first taste of this sweet corn goodness back in June when we celebrated the Triple Thanksgiving in June Birthdays.  LaDawna brought this fantastic side dish, that is probably not something you would want to count the calories for, but it's oh-so-good!  Catherine and I decided we just had to have it as part of our Feast of Christmas Eve, so as LaDawna was rushing up to her own family's Christmas up in Maine, she sent me the recipe for us to enjoy.  Thank you LaDawna (and Darolyn)!
  • (3) 16 oz. packages of frozen yellow and white corn mix
  • 8 oz. cream cheese
  • ¼ cup butter
  • 3 Tbsp. water
  • 2 Tbsp. milk
  • 2 Tbsp. sugar
  • 4 slices of processed cheese, cut into small pieces
    (We used Sargento's Cheddar/Mozzarella slices)
DIRECTIONS
  1. Combine all ingredients in a slow cooker, mixing well.
  2. Cover and cook on low for 4 hours or until heated through and cheese is melted.
Note:  I goofed and forgot to get this going by 9:00 a.m.  I didn't realize until 11:00.  DOH!  We quickly put everything in the crock pot and put the setting on high, for about two hours.  As it got closer to eating time, and it still wasn't quite heated through, we transferred everything into a casserole dish, wrapped it in tin foil, and put in the oven at 400° for about 30 minutes.  It was perfect!

Red Velvet Cheesecake Cookies


Feast of Christmas Even, this year, was going to be a smaller affair than past years.  Knowing we were having only about 10 people, we weren't going overboard with the food.  I made the traditional Beast, mashed potatoes, corn casserole, and green beans for the main meal.  Knowing that no one would really be looking for a big dessert, we went in search of something that would be a nice closure to our feast, but wouldn't send everyone over the edge.  A few days ago, Catherine found this recipe, for Red Velvet Cheesecake Cookies, on another blog. She knows that red velvet is a hit with us all, so she thought it would be an interesting recipe to try as a cookie.  I had seen a similar recipe a couple months back, but was afraid it was "cheating" to use a cake mix as one of the ingredients, but since Catherine seemed excited to make them, we went and bought the ingredients.  Last night, on Christmas Eve's Eve, she made the dough and put it in the fridge to chill, as the directions stated... and then promptly fell asleep for the night.  I made the cream cheese balls before I went to bed, and put them in the freezer so they would be ready for us to prepare during the day today.  These were definitely a hit, and something I think I will call dibbs on for next year's cookie swap.  Catherine even plans to take a couple to her dad's tonight so that Santa has a sweet treat when he comes down the chimney.  Merry Christmas 2011 everyone!

Cookies
  • 1 box red velvet cake mix
  • 2 Tbsp. flour
  • 2 eggs
  • ½ cup vegetable oil
  • 1 tsp. vanilla
Cheesecake Filling
  • 4 oz. cream cheese, at room temperature 
  • 2 cups powdered sugar
  • 1 tsp. vanilla
White Chocolate Drizzle
  • 1 ½ cups white chocolate chips, melted

DIRECTIONS
  1. To make cookies, in a large bowl combine cake mix and flour, whisking until clumps disappear.
  2. In the bowl of a stand mixer, mix together cake mix, flour, eggs, oil and vanilla extract. Mix until smooth.
  3. Wrap the dough in plastic wrap. The dough will be oily.
  4. Refrigerate for at least two hours.
  5. To make the cheesecake filling, using a mixer, combine cream cheese, powdered sugar, and vanilla extract. Mix until smooth.
  6. Using a teaspoon, scoop out cheesecake filling into teaspoon balls.
    (I used a Pampered Chef small scoop)
  7. Place plate in the freezer and freeze for at least two hours.  
  8. Preheat oven to 350°. Line a large baking sheet with parchment paper.
  9. To assemble the cookies, take about a 1-2 Tbsp. handful of red velvet cookie dough and flatten in your hands.
  10. Cut each cheesecake filling ball in half.  Place one-half of cheesecake filling in the center of each flattened cookie dough and wrap the cookie dough around the filling.  Completely wrap the cookie dough around the filling before baking so it doesn't leak.
  11. Gently roll into a ball and place on prepared baking sheet. Only bake 6 cookies at a time. The cookies are will spread.
  12. Bake for 11-13 minutes or until the cookies begin to crackle.
  13. Let the cookies cool on the baking sheet for 5 minutes. Remove from baking sheet to a wire cooling rack and cool completely.  
  14. Melt the white chocolate chips in a microwave safe bowl or over a double-boiler.
    (We microwaved for approximately 2 minutes at 80% power, stirring after every 30 seconds)
  15. Drizzle the white chocolate over the cooled cookies.
  16. Let the cookies set until the chocolate hardens. Serve and enjoy!

Note:  If you are going to store the cookies for more than a day, you may want to keep them in the refrigerator.


Saturday, November 12, 2011

Twice Baked Loaded Baked Potato Casserole


Today was the 2nd Annual Mini Thanksgiving for my group of friends.  It has fast become something that we look forward to, as we all come together with our favorite holiday recipes.  This year, Catherine really wanted to try something new for a cheesy potato recipe and she searched the web.  She came up with this recipe from Food Network’s website.
I went to the grocery store earlier this week to get the ingredients, but the funny part of the story is that neither one of us looked at the directions (let alone the title of the recipe) until late last night.  Getting home late, we figured today was going to be a chaotic day, so we wanted to at least get a head start on preparing the cheesy potatoes.  As we read the directions, light dawned on us that this wasn’t sliced or cubed potatoes with cheese – it was really the insides of baked potatoes, mashed with the other ingredients to form a casserole.  Duh – twice baked potatoes!  We stayed up until after midnight baking the potatoes, sautéing up the bacon, and mixing all of the ingredients (we didn’t mix the bacon in until we put in the casserole pan to bake this afternoon).  During the prep, I was anxious that this wouldn’t be a friend-worthy recipe to serve.  Much to our glee, we heard happy “yums” throughout the party, and came home with a completely bare casserole dish.  I think we have found a winner!

UPDATE - 11/10/2012
I made this again for this year's Mini Thanksgiving.  It's in the oven as I type.
I baked the potatoes last night, but I tried something different since I found scooping the flesh from the baked potatoes last year to be extremely tedious.  I peeled the potatoes before baking them, and then wrapped them separately, with a little olive oil basted on each potato, in tin foil.  After they were done, and cooled slightly, I put them in a big bowl to mash and it was SO MUCH EASIER, and tasted just the same.  Just not hassle with the peel this time.
I then added all of the ingredients, mixing together in the large bowl, holding aside the fried bacon in a separate container.  I put the bowl of potato mixture and the container of bacon in the refrigerator overnight.  This morning, we took the containers out one hour ahead of time to let it come to room temperature and then I mixed the the bacon in with the potato mixture and then put it all evenly in a large aluminum tray (I think it's something like 18x10).  I topped it with the shredded cheese and put it in the oven.  I hope it comes out as good as everyone remembers!

  • 10 large russet baking potatoes (about 7 pounds total)
  • 8 Tbsp. (1 stick), at room temperature
  • 1 cup sour cream
  • ½ cup heavy cream
  • 1 tsp. salt
    (recipe calls for 2 tsp. salt, but I found that between the salt and the bacon, it was plenty salty, so next time I would cut down the salt a bit)
  • 1 ½ tsp. freshly ground black pepper
  • 1 lb. bacon, diced and cooked until crisp
  • ½ lb. sharp white cheddar, cut into ½” cubes
  • ¾ lb. mild cheddar, grated (3 cups)
  • ½ cup finely chopped green onions
  • 3 eggs, lightly beaten
  • 1 Tbsp. unsalted butter (for buttering casserole dish)
DIRECTIONS
1.   Preheat the oven to 400 degrees F.
2.   Scrub the potatoes well and rinse under cool running water. Pat dry with paper towels and prick the potatoes in several places with a fork.
3.   Place the potatoes in the oven and bake for 1 hour to 1 hour and 15 minutes, or until tender. Remove from the oven and set aside on a wire rack until cool enough to handle.
4.   When the potatoes have cooled, cut each potato in half and, using a spoon or a melon baller, scoop the flesh out of the skins, leaving as little flesh as possible.
5.   Place the potato flesh in a large bowl and add 1 stick of the butter, the sour cream, heavy cream, salt, and pepper and mash until chunky-smooth.
6.   Add the bacon, cubed white cheddar, half of the grated cheddar, the green onions, and eggs and mix thoroughly.
7.   Butter a large casserole dish with the remaining tablespoon of butter and reduce the oven temperature to 375 degrees F.
8.   Place the seasoned potato mixture in the prepared casserole and top with the remaining grated cheddar.
9.   Bake for 35 to 40 minutes, or until bubbly around the edges and heated through and the cheese on top is melted and lightly golden. Serve hot.

Adapted from:
http://www.foodnetwork.com/recipes/emeril-lagasse/twice-baked-potato-casserole-recipe/index.html

Friday, November 11, 2011

Basic Old Fashioned Bread and Celery Stuffing


The first year I hosted a Thanksgiving (I can't even remember which year that way), my sister-in-law, Judi, brought me this dated and well-used pamphlet from 1981 called "The Turkey Textbook -- the secret to tender turkey".  I'm not sure if she got it from the grocery store or a magazine, but in it holds the keys to making Thanksgiving dinner, including roasting a turkey and making a stuffing to fill the bird.  Although I don't stuff my turkey, I've started making this delicious recipe, using the notation below about baking the stuffing in a casserole dish before serving.

  • 4 cups diced celery
  • 1 cup chopped onion
  • 1 cup butter or margarine
  • 4 quarts dry bread cubes/crumbs
  • 1 tsp. salt
  • ½ tsp. garlic powder
  • 1 ½ tsp. poultry seasoning
  • ½ tsp. sage
  • 1 tsp. pepper
  • Hot chicken broth

DIRECTIONS
    1. Cook celery and onion in butter until onion is translucent, but not brown.
    2. Combine with bread and seasonings.  Toss lightly.
    3. Add enough hot broth to moisten
    4. Either stuff a 14-18 lb. bird with the stuffing, or place in a baking dish and heat until ready to serve, to keep warm.
Other notes:
  • Buy Texas Toast, or other thick bread to make bread crumbs.
  • If bread is not dried out sufficiently when ready to make, spread bread cubes on a cookie sheet and bake for 10-15 minutes at 225, until bread starts to dry out, but now browned.
  • Add 2 eggs to help the stuffing stick together, if you prefer.
  • Since I do not stuff the bird, I put the stuffing in a casserole dish and bake at 325 for about 15-20 minutes, or to keep warm (I drop the temperature of the oven and cover with tin foil if it's going to be longer than that)

Friday, August 26, 2011

Hershey's Perfectly Chocolate Chocolate Chip Cookies


Yesterday was my brother-in-law, Joey's, birthday.  He and Caroline drove out from Syracuse today, and every time he knows he's going to see Catherine, he asks her what kind of cookies she's going to make him.  As they were driving towards us, Catherine told me she had to make the cookies for Uncle Joey.  When I was on the phone with Caroline, we asked if he had any requests, and he said chocolate chip are always a favorite.  Since we've made those so many times before, we decided to add a twist.  Having just come back from Hershey Park in Pennsylvania, we saw the recipe online for these cookies, we thought they would be PERFECT -- and they were!
  • 2¼ cups flour
  • 1/3 cup Hershey's cocoa
  • 1 tsp. baking soda
  • ½ tsp. salt
  • 2 sticks butter, softened
  • ¾ cup sugar
  • ¾ cup packed light brown sugar
  • 1 tsp. vanilla
  • 2 eggs
  • 2 cups Hershey's Special Dark or semi-sweet chocolate chips
    (we used Toll House (oops) semi-sweet)
DIRECTIONS
  1. Preheat oven to 375F
  2. Stir together flour, cocoa, baking soda and salt and set aside
  3. Beat butter, sugar, brown sugar and vanilla in a mixing bowl on medium until creamy.
  4. Add eggs, and beat well.
  5. Gradually add flour mixture, beating well
  6. Stir in chocolate chips.  (Add 1 cup of chopped nuts, if desired).
  7. Drop by rounded teaspoons on to an ungreased cookie sheet.  (We used a Pampered Chef small scoop)
  8. Bake 8 minutes or until set.
  9. Cool slightly and remove from cookie sheet to a wire rack.

Monday, July 25, 2011

Southern Swedish Meatballs

What's the common theme in a lot of my recipes?  MARTHA, MARTHA, MARTHA.  Guess what?!  This recipe DID NOT come from Martha.  But... it was made BECAUSE OF Martha.  Yesterday, we had a celebration for the most anticipated event of the past 3+ years -- Martha and her husband welcoming a beautiful baby boy into their family and our group joyously showering them with (hopefully) everything they could need!


Our theme for the shower was to try and cater to Martha's love of the Muppets.  This turned out to be a little harder than we thought, but one of the easy things was thinking of the Swedish Chef and making Swedish Meatballs.  I asked LaDawna and she said she had a great recipe, but they were not just Swedish, but SOUTHERN Swedish.  We couldn't figure out what Southern Swedish meant, other than speculating that these are kind of like Southern Fried Chicken Steak, or something.  Regardless, they were fun to make (totally from scratch) and flavorly delicious!  The day before the Shower, the kids and I went to LaDawna's, and as Catherine and LaDawna made 3 different batches of cookies, I made the meatballs -- rolling out 6 batches of this recipe, making 250 meatballs!  Considering there were only about 2 dozen left, I deem these a hit!

Meatballs
  • 1 lb. ground beef (85%)
  • 1 packet Lipton onion soup mix
  • 2/3 cup evaporated milk
  • 2 Tbsp. Worcestershire sauce
DIRECTIONS
  1. Preheat oven to broil
  2. In a bowl, mix all of the ingredients together
  3. Form into small, bite-sized balls
  4. Line cookie sheet with aluminum foil
  5. Broil meatballs on bottom rack for approximately 15-20 minutes or until starting to brown
  6. Flip meatballs to broil on other side for approximately 10-15 minutes more, until starting to brown and cooked through
Sauce
  • 2 cups ketchup
  • 1 cup brown sugar
  • 1 Tbsp. Worcestershire sauce
DIRECTIONS
  1. In crockpot, combine all sauce ingredients
  2. Turn crockpot on to LOW
  3. When sugar melts, add meatballs
  4. Cook as long as desired -- as little time as when the sauce and meatballs are warm, or as long as you want.  The longer the better!

Yields about 35-50 meatballs, depending on the size
I tripled the recipe for the party of 20 adults

Sunday, June 5, 2011

Mango Margaritas


Mexican themed Family Game Night needed a Mexican themed drink.  A couple weeks ago, we were all shopping at BJ's and Catherine wanted to try mango.  Well, you know shopping at BJ's... you don't leave with just one mango -- you come out with a package of 6 huge mangoes.  Not surprising, I'm not sure how much Catherine really managed to eat, but I remember that I gave at least 2 or 3 to LaDawna, and I think we cut up at least 1.  Looking in the fruit drawer, there were still 2 remaining.  I had asked my friends "what to do with mango?", hoping to get ideas.  My friend, Cindi, came up with the awesome idea of Mango Margaritas, and gave me her recipe.  For our game night of 6 people, I quadrupled this recipe, and had a little leftover for me to enjoy tomorrow.  Muy delicioso!
  • 1¼ oz. silver tequila  (Oops!  I think I actually used white)
  • 1 oz. triple sec
  • 1½ oz. freshly squeezed lemon juice
  • 2 oz. simple syrup  (See instructions below)
  • ¾ cup partially frozen mango, unsweetened  (Jim actually added a little of the tequila before he put in the freezer)
DIRECTIONS
  1. Make simple syrup -- In a small saucepan, boil 1 part water.  Dissolve 2 parts sugar into the boiling water, stirring constantly.  Once the sugar is dissolved completely, remove the pan from the heat.  Allow to cool completely and thicken.
  2. Place all ingredients in a blender and blend until smooth.
  3. Pour the mixture into hurricane-style glasses.

Fajitas


It was time to make the meal plan for the next Family Game Night.  Gabi came over last week to help me plan it, and somehow we got on the idea of making it a Mexican theme.  We thoughts Fajitas would be fun, and also added all the fixings, plus Sangria, Margaritas, and Key Lime Pie.  Never having made Fajitas before, I took to the internet and found a recipe on Food Network, by Giada De Laurentis, that used the same marinade recipe for both chicken and steak.  I quadrupled the below recipe, to make enough marinade for the meat that I bought.  I ended up getting one piece of steak and one piece of chicken for each person (we were a party of 6 tonight).  I fresh squeezed all of the juices and Jimmy grilled it all outside.  Sampling some of the steak as I was cutting it, it tasted delicious, but I was a little surprised how non-Mexican it tasted.  Of course, I said to myself, I took the recipes from the Italian cooking show, so why am I so surprised?  lol.... But once we put it together with the tortillas, the grilled onions and peppers, and the other fixin's (my homemade guacamole, sour cream, shredded cheddar cheese, and salsa), these Fajitas were pretty amazing (if I do say so myself).
  • ½ cup orange juice  (I used fresh squeezed)
  • ¼ cup olive oil
  • 2 large limes, zested and juiced
  • ¼ cup agave nectar, or 3 Tbsp. brown sugar  (I used the brown sugar)
  • 3 cloves garlic, minced
  • 1 Tbsp. dried oregano  (I omitted this)
  • 1 Tbsp. chili powder
  • ½ tsp. kosher salt
  • 4 boneless, skinless chicken breast  (I used thin chicken cutlets, and cooked 1 per person)
  • 1 (12-16 oz.) skirt or flank steak   (I cooked 1 per person) 
  • Flour tortillas 


DIRECTIONS
  1. In a bowl, combine the orange juice, olive oil, lime juice, lime zest, agave nectar (or brown sugar), garlic, oregano, chili powder, and salt.
  2. Pour the mixture into a marinating container or gallon-sized plastic bag.
  3. Add the chicken and steak and refrigerate for 4 hours, turning meat occasionally.
  4. Reserve the marinade  (Oops! I forgot to do this part... this probably would have tasted good too!)
  5. Grill the chicken, about 5-8 minutes on each side.  Grill the steak, about 5 minutes per side for medium.  Allow the meat to rest before slicing.
  6. (This is what I forgot to do)  Meanwhile, put the marinade in a small saucepan and bring to a boil over medium-high heat (in order to kill any bacteria).  Boil for 5 minutes until slightly thickened.  Pour the marinade over sliced meat and toss until coated.
  7. Serve meat in warm tortillas with fixings of your choice.

Wednesday, June 1, 2011

Stuffing Crusted Chicken Tenders


Tonight was Wicked Weather Wednesday -- we had a severe weather in the form of tornado warnings followed by a pretty amazing thunder and lightening storm.  We, thankfully, were spared the most severe weather, between our trips to the basement and being glued to the tv at the tornado destruction in Springfield, dinner time had quickly slipped my mind.  (Well, it slips my mind often.  Tonight, I just had a legitimate excuse.)  I found some chicken tenders in the freezer that I was able to quickly defrost, but I wasn't sure what to do with them, other than the usual of coating with bread crumbs, which sometimes tastes "eh".  I quickly searched allrecipes.com and came up with the following.  I added a little egg to help the stuffing adhere to the chicken tenders, and I have to say, I thought this was a pretty good experiment.

The below is the recipe from allrecipes.com (by Lynne B), but I used more chicken tenders, so I kept making more of the stuffing/butter mixture to ensure there was enough for all of the chicken tenders.
  • (1) 9 oz. package of chicken tenderloins
  • ½ cup finely crushed dry stuffing mix
  • 2 Tbsp. melted butter
  • 1 egg
  • Dash of milk or light cream
DIRECTIONS
  1. Preheat oven to 350° F.
  2. Line a 9x13" baking dish with foil.  Rinse and pat dry chicken.
  3. Beat egg with milk in one bowl.
  4. In a second bowl, melt butter.  Add dry stuffing mix and combine.
  5. Take each chicken tender and coat with egg mixture and then stuffing mixture and line in the baking dish.
  6. Sprinkle any remaining stuffing mixture over top of chicken tenders.
  7. Bake for 40 minutes, until chicken is cooked through.

Sunday, May 8, 2011

Flourless Chocolate Cake

Happy Mother's Day 2011!  Catherine decided to add to the Mother's Day meal of pork tenderloin and mashed potatoes, and made a fantastic dessert.  She pulled out the Delicious Disney Desserts book we bought while on our 2009 Disney Cruise, and found the Flourless Chocolate Cake that we believe we had during the Golden Mickey's formal night while onboard.  You know how when you go out to a restaurant and you have a dish that you feel like you would never be able to replicate at home?  Well, I have to say, Catherine did an amazing job (with a tiny little help from moi)!  This little cake was moist, rich, and full of decadent chocolatey goodness!

For the Cakes:
  • 1 cup butter, cut into small pieces
  • 1 cup dark chocolate chips
  • ½ cup cocoa powder
  • 2 Tbsp. freshly brewed espresso
  • 2 Tbsp. hot water
  • 6 eggs
  • 1 cup granulated sugar
  • 2 Tbsp. rum
DIRECTIONS
  1. Preheat oven to 325°F.  Grease muffin tin (capacity of 12).
  2. Combine butter and chocolate chips in a glass bowl and microwave on high for 60 seconds.  Stir until smooth.  If not melted completely, return to microwave for 15-second intervals, stirring between each until melted.  Set aside.
  3. Combine cocoa powder, espresso, and water in a separate bowl.  Stir until smooth and set aside.
  4. Combine eggs, sugar, and rum in a large mixing bowl, whisking thoroughly.  Add cocoa-espresso mixture to egg mixture, then stir in melted chocolate mixture.  Whisk until smooth and creamy.
  5. Pour batter into prepared muffin molds and bake until cakes puff slightly and surfaces are set, about 22-25 minutes.
  6. Cool, then refrigerate for at least 3 hours.
    (We only had them cool for about 10 minutes and then removed from tins and cooled on a rack until the ganache was ready)
For the Ganache:
  • 1 cup heavy cream
  • 1 cup dark chocolate chips
DIRECTIONS
  1. In a medium saucepan over medium heat, add heavy cream and bring to a boil.
  2. Remove from heat and stir in chocolate chips, whisk until smooth.
  3. Set a wire rack over a large bowl and, one cake at a time, place on wire rack and coat with ganache, making sure cover the sides of the cake.
    (We added an extra touch of sifting powdered sugar over the tops)
  4. Refrigerate until ready to serve.

Saturday, April 23, 2011

Cincinnati Chili

I wasn't always from 'round these parts. A long time ago, in a galaxy far, far away... ok, so it was the Midwest... anyway, my early youth was spent in Chicago and then Cincinnati, before we moved to Red Sox Nation. Now, during those first few years, I'm sure I didn't really have a lot of interest in something like chili, but I remember even after we moved to Massachusetts, we would make our yearly pilgrimage back to the Midwest to visit my grandmother in Michigan, with a stop in Ohio. Somewhere along the line, I have recollections of trying and liking Cincinnati Chili. Sadly, my grandmother has been gone almost 10 years now, and I have no idea when the last time I had Cincinnati Chili was, but for the past couple years, every now and then I would get a hankering for it.

Flash forward to this past week as we were hosting another Family Game Night... what to cook, what to cook? I decided this would be my chance to make Cincinnati Chili! Although a couple nameless family members were afraid to try it because of the spices in it, I have actually gotten several raves on this recipe when it was served hot off the stove, but also as next day leftovers.

  • 1 large onion, chopped
  • 1 lb. extra lean ground beef
  • 1 clove garlic, minced
  • 1 Tbsp. chili powder
  • 1 tsp. ground allspice
  • 1 tsp. ground cinnamon
  • 1 tsp. ground cumin
  • ½ tsp. red (cayenne) pepper
  • ½ tsp. salt
  • 1½ Tbsp. unsweetened cocoa
  • 1 (15-oz.) can tomato sauce
  • 1 Tbsp. Worcestershire sauce
  • 1 Tbsp. cider vinegar
  • ½ cup water
DIRECTIONS
  1. In a large frying pan, over medium-high heat, saute onion and ground beef, until ground beef is browned. Add garlic and chili powder and stir until combined.
  2. Add allspice, cinnamon, cumin, cayenne pepper, salt, cocoa, tomato sauce, Worcestershire sauce, cider vinegar, and water.
  3. Reduce heat to low and simmer for 1 hour and 30 minutes.
TOPPINGS
Traditionally, Cincinnati Chili is served on top of spaghetti. That is called a Two-Way

A Three-Way, also adds shredded cheddar cheese.

A Four-Way, also adds chopped onions.
(In the picture above, I used green onions)

And the ultimate Five-Way, also adds kidney beans on top.


For Family Game Night, I also had baked potatoes available and another options was to put the Chili on top of the potato.

Yields: 6-8 Servings

Original Recipe

Thursday, February 3, 2011

Buffalo Chicken Macaroni and Cheese

This winter has been rough with all of the cold and snow, and it has called for some good, hearty meals. One that we have enjoyed has been the Macaroni and Cheese that I received while making my sister's wedding cookbook. Looking to try some other variations of mac and cheese, I was so excited to see my friend Stephanie post this recipe on Facebook. She actually writes a column for the Miami's examiner.com. She posts some amazing recipes, and she's one of my new go-to people (after Martha, of course ;-)). Anyway, this recipe is simply that -- AMAZING! I made a few minor tweaks along the way, but I'm quite impressed!
  • 8 oz. of pasta -- half of a box
    (I used penne because I didn't have any casserole macaroni left)
Chicken
  • 1 large chicken breast
    (The original recipe called to stir fry it with 2 Tbsp. olive oil, 2 Tbsp, butter and 1 tsp. minced garlic, but I just boiled it on the stove and then added the hot sauce)
  • About ¼ cup hot sauce
    (The original recipe called for about a 1/2 cup, but knowing my family isn't into spicy, I cut it down, and it still tasted delicious)
Sauce
  • 1 Tbsp. butter
  • 1 Tbsp. flour
  • 1 tsp. dry mustard
  • ½ cup light cream
    (The original recipe called for 1 1/4 cups of heavy cream. To cut down the calories, I used the light cream, and the following milk)
  • ¾ cup fat free Hood Smart Milk
  • 2 Tbsp. hot sauce
  • 1 cup shredded cheddar cheese
  • 4 oz. cream cheese
  • ¼ cup sour cream
Topping
  • ¼ cup plain bread crumbs
  • 1 Tbsp. butter, melted
DIRECTIONS
  1. Preheat oven to 350 degrees.
  2. Bring a large pot of salted water to boil. Add the pasta and cook until al dente and drain and set aside.
  3. Prepare the chicken -- either with the ingredients from the original recipe, or simply boil it. Dice the chicken. Toss the chicken with the ¼ cup hot sauce in a bowl and set aside.
  4. Prepare the sauce by melting the butter in a saucepan over medium heat. Whisk in the flour and the dried mustard until a smooth paste forms. Whisk in the cream/milk. Once the cream comes to a boil, whisk in the hot sauce, cheddar cheese, and cream cheese. Once the cheeses have melted, add the sour cream.
  5. Combine the cooked pasta, diced chicken and cheese sauce.
  6. Pour into an 8x8" casserole dish.
  7. Prepare the topping by combining the melted butter with the bread crumbs until they bread crumbs are evenly coated with the butter.
  8. Sprinkle bread crumb mixture over top of pasta.
  9. Bake for 10-15 minutes at 350 degrees, or until golden brown.

Yields 6 Servings
Nutritional Information

453.9 Calories, 34.1 Total Fat, 21.2 Saturated Fat, 71.8 Cholesterol, 950.6 Sodium, 39.2 Potassium,
20.3 Total Carbohydrates, 0.9 Dietary Fiber, 4.7 Sugar, 15.2 Protein

Saturday, January 29, 2011

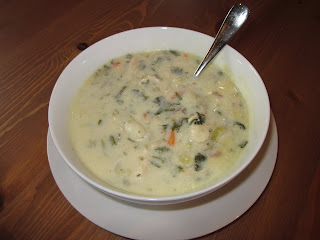
Chicken and Gnocchi Soup

Just before Christmas, I met my friend Amy (who I work with) for lunch at The Olive Garden. Amy suggested the unlimited soup, salad and breadsticks. I'm a big chicken soup fan, and their Chicken and Gnocchi Soup looked different. It was delicious. I had two bowls and really wanted more, but I was stuffed. I came home and looked on the internet and found a few people had come up with their own versions. On the fourth no-school-snowy day of the year, Catherine wanted to cook something, and I told her it was a good soup kind of day. With a little help from mom, this is the one Catherine made for our lunch. Although I cannot remember exactly what The Olive Garden one tasted like, this one was definitely a winner.
  • 2 cups chicken breast, cooked and diced
    (I boiled 2 chicken breasts. The original recipe also recommends using rotisserie chicken)
  • 4 Tbsp. butter
  • 4 Tbsp. flour
  • 1 cup light cream
    (the original recipe called for 1 quart half and half. We only had a little light cream and milk, and since it still tasted great, I will continue to make it this way, as it will cut down on the calories and fat)
  • 3 cups milk (I used Hood Fat Free Smart Milk)
  • 3 cups chicken broth
  • ½ cup celery, chopped
  • 2 cloves garlic, minced
  • 1 cup carrots
    (the original recipe calls for shredded carrots. I used several baby carrots, cut length-wise, and then sliced as thin as I could without cutting my fingers off, and then cut those slices in half, to make little "shreds")
  • 1 cup onion, diced
  • 1 cup spinach
    (the original recipe calls for fresh spinach, but I used about a half of a package of frozen, thawed and drained)
  • 1 Tbsp. extra virgin olive oil
  • ½ tsp. thyme
  • ½ tsp. parsley
  • Salt and pepper to taste
  • 1 lb. gnocchi
    (I found pre-made gnocchi in the pasta aisle -- not refrigerated. Next time, I might want to try with a fresher version, or even a frozen)
DIRECTIONS
  1. Cook gnocchi according to the package directions.
  2. Saute the onion and celery in the butter and olive oil over medium heat.
  3. When the onion starts to become translucent, add the garlic.
  4. Cook for 1 minute and then add the flour to make a roux.
  5. Let the butter and flour mixture cook for about another minute.
  6. Add the cream and milk.
  7. Into the roux, add in the carrots and the chicken.
  8. Once the mixture becomes thick, add the chicken broth.
  9. Once the mixture thickens again, add the cooked gnocchi, spinach and seasonings.
  10. Simmer until the soup is heated through.

Yields 8 Servings
Nutritional Information

330.3 Calories, 14.8 Total Fat, 7.0 Saturated Fat, 38.9 Cholesterol, 634.8 Sodium, 66.2 Potassium,
33.7 Total Carbohydrates, 1.9 Dietary Fiber, 8.5 Sugar, 16.7 Protein